User Interface (Civil 3D essentials)
Overview
Autodesk Civil 3D is an object-oriented design environment with defined interactions between civil design objects. For example, changes made to the elevations of a surface will result in changes to surface Profiles and cross-sections. Autodesk Civil 3D's major land development components are interactive objects as well. As a result, the software environment is suited for design, with production draughting as a by-product of the design process.
There are several tools in Autodesk Civil 3D to assist the designer. The tools are broken up into subcategories, called Workspaces. There are four different Workspaces, each containing tools for a specific working environment. Each workspace has various tools as explained below.
Workspaces
Autodesk Civil 3D comes with several default workspaces. You can use these workspaces with their default layouts or modify them according to your requirements. Workspaces are sets of menus and toolbars that are grouped and organized so that you can work in a custom, task-oriented drawing environment.
When you use a workspace only the menus, toolbars, and secondary windows specified for that workspace are displayed in the interface. You can still access the commands not showing in the menus by entering their command names in the command line. You can switch between workspaces by using the Workspace Switching button located in the application status bar.
Workspaces in Autodesk Civil 3D include:
- Civil 3D: This workspace displays user interface components related to civil engineering design and survey features available in Autodesk Civil 3D.
- 2D Drafting & Annotation: This workspace displays user interface components related to the AutoCAD 2D drafting and annotation features available in AutoCAD Civil 3D.
- 3D Modelling: This workspace displays user interface components related to the AutoCAD 3D modelling features available in Autodesk Civil 3D.
- Planning and Analysis: This workspace displays user interface components related to the AutoCAD Map 3D features available in Autodesk Civil 3D.
For more information about using and customising workspaces, see the AutoCAD User's Guide and the AutoCAD Customization Guide in the AutoCAD Help.
Ribbons
The Autodesk Civil 3D ribbon is the primary user interface component for accessing commands and features. Commands available from the ribbon are organised into tabs. Each tab is organised into a series of panels, which are labelled by task. The ribbon is typically turned on (displayed) by default, it can be displayed or removed using the Ribbon and RibbonClose commands. There are two basic types of ribbon tabs: static and contextual.
Static Ribbon Tabs
Static ribbon tabs are always displayed when the ribbon is turned on, containing most of the functionality in the menu bar, drop-down menus and toolbars. Static ribbon tabs have a grey background colour.
Contextual Ribbon Tabs
Contextual ribbon tabs are displayed automatically when you select an object or invoke an object-specific command. For example, when you select a pipe network object, the Pipe Network contextual tab is displayed. Contextual tabs contain commands that are related to the currently selected object. Most contextual tabs can be closed simply be deselecting the object.
Non-object Selection Contextual Tabs (purple)
Contextual tabs that are displayed when no objects are selected have a purple background colour. For example, if you click the Assembly button on the Modify tab, the Assembly non-object select contextual tab will display, this type of tab has a purple background colour. This provides access to all commands related to assemblies without having to select an assembly in the drawing.
Non-object selection contextual tabs have a Close button at the end to dismiss them. If you select an object while this tab is displayed, the non-object selection tab is automatically closed and replaced with the object select contextual tab.
Section Editor Tab (blue)
Because its ribbon behaviour is slightly different than the previous two types just described, the Section Editor tab has its own unique background colour — light blue (teal).
Multiple Object Selection Ribbon Tabs
When multiple types of objects are selected simultaneously, the Multiple contextual tab is displayed in the ribbon. For example, if you select both a pipe network object and an alignment object, the Multiple contextual tab will display.
Toolspace
The Toolspace window is an integral component in the user interface, it allows users to access commands, styles, and project data. It contains the Prospector, Settings, Survey, and Toolbox tabs. Right-click each collection or item listed in these tabs to access specific commands.
The Toolspace is a dialog box that manages the drawing with its content. Similar than the normal properties dialog box which is the main window users use to interact with the drawing objects, the Toolspace dialog box allows users to interact with Autodesk Civil 3D items. If a civil object exists in the drawing, it is listed in the Toolspace dialog box.
The Toolspace has four tabs, each performing specific tasks.
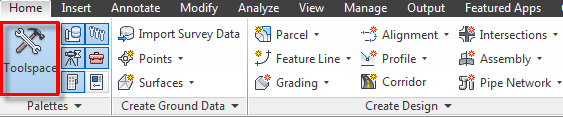
Open toolspace
-
Click the Home or View tab
 Palettes panel Toolspace
 .
.
Note: at least one Toolspace tab must be in the "open" state or the Toolspace button is greyed out. In this case, click one of the tab display buttons on the ribbon to open the tab.
- If the tabs you want to use are not displaying in the Toolspace, use the following ribbon buttons to open them:


Tip: Closing the Toolspace window can help improve overall performance as well as save memory, it is recommended to close the Toolspace window when it is not necessary to use it. When working in the Toolspace, it is also recommended to close the Toolspace tabs (Prospector, Settings, Survey, or Toolbox) which you do not need to use.
Use the drop-down list at the top of the Prospector tab to control which items are displayed in the Prospector tree.
-
Master View. Displays all open project and drawing items, including drawing templates. The name of the active drawing is highlighted.
-
Active Drawing View. Displays only items in the active drawing. If you switch to another drawing, the tree is updated to reflect the new drawing items.
The symbols displayed at the tree node, to the far left of each collection name, give users information about the display of the items in the collection:
 | The items contained in the collection are displayed. Click to collapse the tree and hide the items. |
 | The collection contains no items. |
 | The collection contains items that are not displayed. Click to expand the tree and display the items. |
 | The collection contains items that cannot be displayed in the tree. Click the collection name to list the items in the Toolspace's item view. |
 | The collection's data needs to be refreshed. Right-click the collection and click Refresh. |
 | The item is a reference to an item located elsewhere in the tree. Double-click the reference to navigate to the actual item. |
 When the Toolspace tabs are in the "closed" state, the ribbon buttons have a white background.
 in the Toolspace window or click the Toolspace
 Use the icons at the top of the Prospector tab to control the display of icons within the Prospector tree, to display the Panorama window, and to access help.
