Working with Catalogs and Part Lists
Set Pipe Network Catalog
Before you start with the pipe network design, you must specify which Pipe Network Catalog you want to use. If you use the Devotech iDAS template for your design, you must use the iDAS Pipe Catalog.
-
To set a Pipe Network Catalog, use the Home ‒ Set Pipe Network Catalog command:
-
This command opens a window where you can choose the path for the Catalog Folder (the location where the catalog is stored), Pipe catalog and Structure catalog:
iDAS Pipe Catalog is saved in the following folder:
C:\Program Files\Autodesk\ApplicationPlugins\DEVOTECH.Bundle\Contents\iDAS Pipe Catalog
It is good practice to restart Civil 3D after you change the catalog because it sometimes happens that the pipes or structures cannot be adjusted until you restart Civil 3D.
Add Devotech Pipe and Structure Properties to Other Catalogs
Devotech iDAS can use any pipe catalog but some functions require the Devotech pipe and structure properties. These properties are stored in the AeccPartParamCfg.xml file which is saved in the pipe catalog Aecc Shared Content folder. Before you copy the AeccPartParamCfg.xml file from the iDAS Pipe Catalog (pipe catalog developed by Devotech) to your catalog, close Civil 3D and create a backup of the original file. Go to your pipe catalog, folder Aecc Shared Content and rename the file AeccPartParamCfg.xml to AeccPartParamCfgBackup.xml:
To get the iDAS Pipe Catalog AeccPartParamCfg.xml file, go to:
C:\Program Files\Autodesk\ApplicationPlugins\DEVOTECH.Bundle\Contents\iDAS Pipe Catalog\Aecc Shared Content and copy the AeccPartParamCfg.xml file to your catalog:
iDAS Pipe Catalog AeccPartParamCfg.xml file in the custom pipe catalog:
Network Parts List
A pipe network catalog contains various pipes and structures but not all of them are necessary for every project. Civil 3D allows users to create a Network Parts List in the drawing (or template) which only loads specific pipes and structures.
The Devotech drawing template contains the following parts lists:
- Jacking
- Sewer
- Stormwater
- Water
The parts lists can be found in the Toolspace – Settings – Pipe Network:
Create Part List
-
To create a new Network Parts List, go to Home ‒ Create Network Parts List in the ribbon. This command opens a window where you can specify the pipes and structures you want to use for your project.
-
To add pipes, go to the Pipes tab, right-click on New Parts List and select Add part family from the menu.
-
Another window opens where you can choose the pipe families you want to use.
The inserted part families will display in the Network Part List.
-
The families are empty because the pipe sizes were not specified. To do that, right-click on the network family and select Add part size from the menu.
-
You can specify the part size, or you can add all the available part sizes from the pipe catalog.
Pipe sizes imported into the parts list:
The same method, described for pipes, can be used for structures.
Import Pipes from a Catalog or from Another Parts List
The example below describes the workflow to import Rocla In the wall joint pipes to the Water parts list. The same method can be used for any other pipe type or parts list.
-
Go to the Toolspace – Settings −Pipe Network – Parts Lists and open the Water parts list:
-
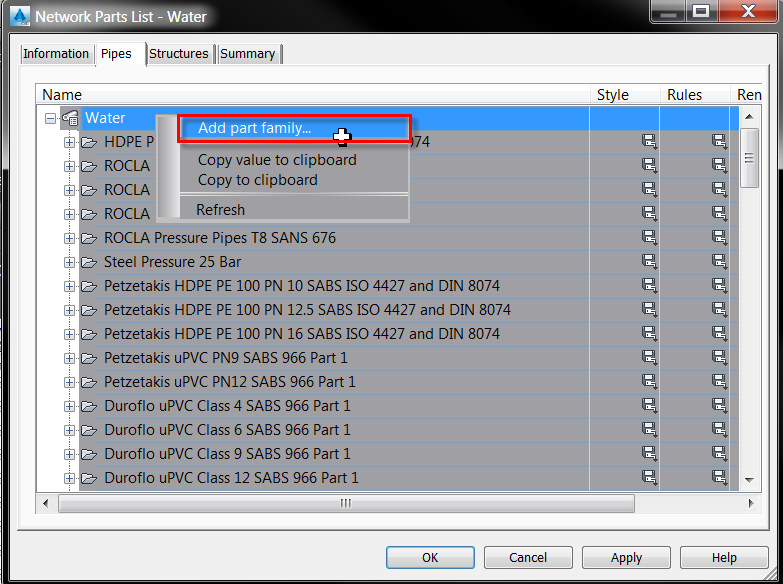
Go to the Pipes tab, right-click on Water and use the Add Part Family command:
-
Select the desired pipe type:
-
Scroll down in the Pipes tab, right-click on the imported pipe type and select the Add part size command from the menu:
-
Select a specific pipe size or tick Add all sizes:
Imported sizes:
- Assign the correct Style and Rules:
Add Custom Pipe Sizes to Existing Pipe Family
If you want to create custom pipe sizes, copy the Devotech iDAS pipe catalog to a location which is backed up regularly. Do not modify the Devotech iDAS catalog directly in the installation folder because it will get replaced every time a new Devotech iDAS version is installed. This will cause drawings with custom pipe sizes to not work properly once the modified pipe catalog is replaced.
The Devotech iDAS pipe catalog is saved in the following folder:
C:\Program Files\Autodesk\ApplicationPlugins\DEVOTECH.Bundle\Contents\iDAS Pipe Catalog. Copy the entire catalog folder. The catalog name can be changed according to your needs.
-
Link Civil 3D to the new catalog, go to the Home tab, Create Design panel and select the Set Pipe Network Catalog command:
-
Browse to the pipe network catalog, copy and restart Civil 3D:
-
The workflow further shows how to add larger pipe sizes for ROCLA Interlocking 100D SANS 677 pipes. The same workflow can be used for any other pipe type. In the Home tab, go to the Create Design panel and select the Part Builder command:
-
Set the Part Catalog to Pipe, browse to ROCLA Interlocking Class 100D SANS 677 under the Circular Pipes and click on the Edit icon:
-
If you get a message that this drawing was saved with an earlier version of the software, click Close:
-
Right-click on the Size Parameters and use the Edit Values command:
-
Click on the first icon in the Edit Part Sizes window to add another row in the table:
-
Modify the properties and close the window:
-
Save the changes by clicking on the first icon from the left-hand side in the Part Builder window:
-
Close the Part Builder and save the changes to the part builder drawing (hover the mouse cursor over the top-right corner to display the cross to close the window):
-
Open a design drawing, go to Toolspace – Settings – Pipe Network – Parts Lists, right-click on the parts list you want to modify and select the Edit command:
-
Go to the Pipes tab, right-click on the pipe type you want to modify and select the Add part size command:
-
Specify the pipe diameter you want to import and click OK:
-
Change the Style, set the Rules and click OK:
The new pipe size should appear under the pipe sizes and it can be used for designs:
If someone else needs to work on your design drawing you must provide them with the catalog to be able to modify new pipe sizes.
Create Custom Pipe Type
If you want to create custom pipe type, copy the Devotech iDAS pipe catalog to a location which is backed up regularly. Do not modify the Devotech iDAS catalog directly in the installation folder because it will get replaced every time a new Devotech iDAS version is installed. This will cause drawings with custom pipe types to not work properly once the modified pipe catalog is replaced.
The Devotech iDAS pipe catalog is saved in the following folder:
C:\Program Files\Autodesk\ApplicationPlugins\DEVOTECH.Bundle\Contents\iDAS Pipe Catalog. To copy the catalog, copy the entire catalog folder. The catalog name can be changed according to your needs.
-
Link Civil 3D to the new catalog, go to the Home tab, Create Design panel and select the Set Pipe Network Catalog command:
-
Browse to the pipe network catalog, copy and restart Civil 3D:
-
In the Home tab, go to the Create Design panel and select the Part Builder command:
-
The easiest method is to copy an existing pipe type and modify it. The example below will use the ROCLA Interlocking Class 100D SANS 677. Set the Part catalog to Pipe, browse to Rocla Interlocking Class 100D SANS 677 under Circular Pipes and click on the Edit icon:
-
Click on the second icon from the left-hand side to save the existing pipe type as a new type:
-
Select the Chapter in which you want to save the custom pipe type, specify the Part Name and Part Description. The Devotech iDAS pipe catalog uses the same name for the Part Name and Part Description but it is not necessary:
-
Right-click on Size Parameters and use the Edit Values command:
-
Use the icons in the top-left corner to add or delete rows:
-
Specify the parameters for each pipe diameter:
- PID – Pipe Inner Diameter,
- WTh – Wall Thickness,
- PrtSN – Part Size Name (the name which appears in the part list when pipe is imported from the catalog),
- DEV_Nominal_Diameter – Pipe Nominal Diameter (DEV prefix means that this parameter was developed by Devotech and it only appears in iDAS pipe catalog),
- Mat – Material,
- DEV_Class – Pipe Class (DEV prefix means that this parameter was developed by Devotech, and it only appears in the iDAS pipe catalog),
- BdyD1 – Pipe Inner Diameter which is automatically linked to column PID therefore user cannot change it.
-
Close the Edit Part Sizes window, click on the first icon from the left-hand side in the Part Builder to save the changes:
-
Close the Part Builder (hover the mouse cursor over the top-right corner to display the cross to close the window):
-
Open the design drawing, go to Toolspace – Settings – Pipe Network – Parts Lists, right-click on the parts list you want to modify and select the Edit command:
-
Go to the Pipes tab, right-click on the parts list name and select the Add part family command:
-
Tick your pipe type (the pipe types are sorted by creation time, not alphabetically):
-
Right-click on the imported pipe type and select the Add part size command:
If you want to import all pipe sizes, tick check boxes in the column Add all sizes:
- Change the Style, set the Rules and click OK:
The new pipe type is available for designs in the Network Layout Tools toolbar:
Trapezoidal Channels
The Devotech iDAS Pipe Catalog contains about 900 channel sizes for each channel side slope. The width and height vary from 100mm to 3 000mm. There are eight channel side slopes available 1:1.5, 1:2, 1:2.5, 1:3, 1:3.5, 1:4, 1:4.5, 1:5. Bringing all the sizes into the parts list will increase the Devotech Civil 3D template size by about 3MB, thus we decided to only add six sizes for each channel side slope:
Add Channel Size from the List
-
To add another trapezoidal channel size from the available list, right-click on the parts list (Toolspace – Settings – Pipe Network – Parts Lists) and select Edit from the menu:
-
Right-click on the channel type you want to add sizes to and select Add part size from the menu:
-
Specify the Wall Thickness, Height, Bottom Width and click OK. Only sizes within a range of 100mm to 3 000mm with a 100mm step are available. For user defined sizes see the next chapter.
Change the channel style and rules:
Add User Defined Channel Size and Side Slope
-
Click on the Part Builder command in the Home tab:
-
Select any trapezoidal channel and open it:
-
Click on the Save As button:
-
Specify the new Part name:
-
Right-click on the Model Parameters and select Edit:
-
Select the LenA3 parameter and click on Calculator:
-
Change the first digit to the desired slope (for 1:1.75 type 1.75, for 1:4 type 4 etc.):
-
Right-click on the Size Parameters and select Edit Values from the menu:
-
Select the parameter you want to change and click on the Edit icon.
PIH – Pipe/Channel Inner Height,
PIW – Pipe/Channel Inner Width,
WTh – Pipe/Channel Wall Thickness.
-
Override the existing values or add new values:
-
Once you finish with the changes, click on the cross button in the top-right corner of the Part Builder window to save the changes:
-
Right-click on the parts list (Toolspace – Settings – Pipe Network – Parts Lists) and select Edit from the menu:
-
Right-click on the parts list name under the Pipes tab and select Add part family from the menu:
-
Tick the new parts family and click OK:
-
Right-click on the new family and select Add part size from the menu:
-
Specify the size you want to add or tick the Add all sizes option. Unfortunately, the Add all sizes option only adds about 450 part sizes.
Custom trapezoidal channel in the parts list: